Contents
Index
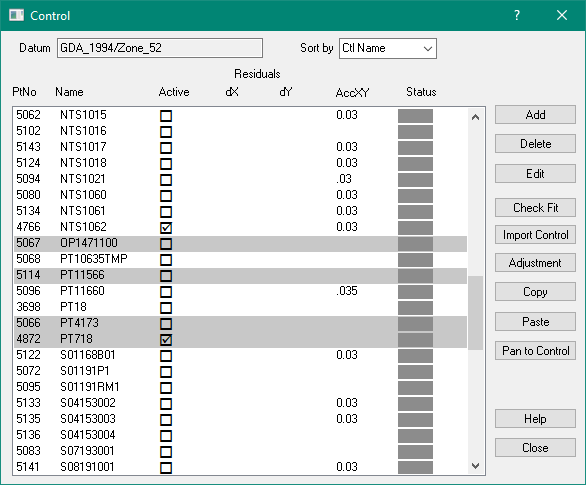
Control Points
This option allows the user to add, delete or change control point data.
Control points are used by the adjustment to determine the co-ordinate system of the network and to
constrain the network by use of known stations. Control points are shown on the screen with the
control point name highlighted. The coordinates for all control points must be on the same
datum and zone as specified for the job. Heights are optional, but if they are specified they will
be used in the adjustment to apply height corrections for measurements.
Some control points are 'greyed out' in the listing.
These control points cannot be made active due to their status value.
If the Status is Lodged - you cannot chnage the Active status.
If the Status is Predicted - you cannot chnage the Active status.
These restrictions are in place to stop you accidentally using an control point that has not been confirmed as accurate
Datum/Zone
This field displays the datum and zone if one has been selected for the Plan.
Sort by
Sorts the list of Control points by Name, Point number ....
Points List
This field displays the Point Number, Control Point Name, whether it is active or not, the Residuals and the
Status of the point.
Active - You can make a point Active or Non-Active by clicking on the check box in the list.
Select - You can select control points by cliucking on the row.
Hold down Control/Shift to select multiple control points.
Add
Allows you to add a new control point to the list.
Every point must have a name, and horizontal coordinates (Easting and Northing).
See this page for details.
Delete
The Delete button will delete the control point selected in the window of the control box.
Edit
This will edit the selected control point. You can change any of the control point attributes.
Check Fit
This option computes how the active control points 'fit' to the current points in the job.
A “least squares” procedure is used to compute transformation parameters between the control point
system and the current parcel coordinates. This transform is then applied to the cadastral points
associated with each control point and the residuals (control point value minus the computed value)
is shown in the Control Points list.
The dx, dy columns show how the new coordinates fit with the existing network.
Any control points that have large residuals should be investigated before proceeding.
If there are any doubts with regard to any control points, they should be made inactive
before proceeding with the adjustment
If only two control points are used, always check that both the scale factor and azimuth swing for
the transformation are reasonable before proceeding.
Master File
Allows you to import control points from an external file or another job.
A control point master file can have all the control points for a locality that may cover
a number of parcel ‘areas’.
The file may be the output from a geodetic adjustment or from a GPS system.
The coordinates from that file will be read in and used to update the
coordinates for control points in the job.
Adjustment
This will take you to the Least Squares Ajustment option.
Copy
This will copy the selected control points to the Windows Paste buffer.
You can then paste them into a text file or into another job.
Paste
This option takes the contents of the Paste buffer and tries to insert any control points into this job.
They will then be displayed in the List.
Paan to Control
Pans the main screen so that the first selected control point in the list is
placed in the centre of the screen.
Unjoined Parcels and Control Points
When you unjoin a parcel, the points which used to exist at its corners are removed.
If we did not do this there would be unconnected points scattered all over the job.
The parcel then has its own point numbers starting with one (as it is unjoined)
If there was a control point connected to a particular point on the unjoined lot,
its' point number is also changed so that it refers to the correct point in the lot.
As well, in the control point record the lot/plan ID is stored so that the program knows that
the control point is currently unjoined and that its point number refers to a point number
in that parcel and not to a point number in the joined network.
This is why control points attached to unjoined parcels can have the same point number.